小程序实战(七):小程序时间轴组件
作者:勇康博客网 | 分类:小程序 | 浏览:2708 | 日期:2022年06月14日上一篇我们讲了【小程序获取用户信息】,有兴趣的小伙伴可以移步至(。。。。)查看。这一节我们讲讲【小程序的时间轴组件】。
我这里的标题是小程序的时间组件,其实我这里是将他写成了一个页面,当然,如果你有需求,将其做成一个自定义组件也可以~
这玩意其实没有什么技术难点就是一个小页面,我这里就不赘述了。直接上代码:
Remark.wxml:
<view class="listview-container margin_bottom">
  <block wx:for="{{newList}}" wx:key="index">
    <view class="playlog-item" >
      <view class="dotline">
        <!-- 竖线 -->
        <view class="line"></view>
        <!-- 圆点 -->
        <view class="dot"></view>
        <!-- 时间戳 -->
      </view>
      <view class="content">
        <text class="course">{{item.addtime}}</text>
        <text class="chapter">{{item.content}}</text>
      </view>
    </view>
    <!-- 广告插件 -->
    <!-- <ad unit-id="adunit-5abb45645905fc90" wx:if="{{index % 5 == 4}}"></ad> -->
  </block>
</view>
Remark.js:
//获取应用实例
const app = getApp();
Page({

  /**
   * 页面的初始数据
   */
  data: {
    // 数据列表
    newList:[],
  },

  getData:function(){
    var self = this;
    console.log(self.newList);
    console.log(self.showText);
  },

  /**
   * 生命周期函数--监听页面加载
   */
  onLoad: function (options) {

  },

  /**
   * 生命周期函数--监听页面初次渲染完成
   */
  onReady: function () {

  },

  /**
   * 生命周期函数--监听页面显示
   */
  onShow: function () {
// 监听底部菜单变化
    if (typeof this.getTabBar === 'function' &&
      this.getTabBar())
    {
      this.getTabBar().setData({
        selected: 1    // 根据tab的索引值设置
      })
    }
    var self = this;
    // 请求后台接口获取随言碎语列表
    wx.request({
      // 请求连接
      url: 'xxxxxxxxxxxxxxxxxxx',
      // 请求所需要的的参数
      data: {},
      success(result){
        self.newList = result.data;
        self.setData({
          newList:self.newList,
          showText: self.showText
        })
      }
    });

  },

  /**
   * 生命周期函数--监听页面隐藏
   */
  onHide: function () {

  },

  /**
   * 生命周期函数--监听页面卸载
   */
  onUnload: function () {

  },

  /**
   * 页面相关事件处理函数--监听用户下拉动作
   */
  onPullDownRefresh: function () {

  },

  /**
   * 页面上拉触底事件的处理函数
   */
  onReachBottom: function () {

  },

  /**
   * 用户点击右上角分享
   */
  onShareAppMessage: function () {

  }
})
remark.json
{
  "usingComponents": {},
  "navigationBarTitleText": "时间里的-随言碎语"
}Remark.wXSS:
/*外部容器*/
.listview-container {
  margin: 10rpx 10rpx;
  margin-bottom: 115rpx;
}

/*行样式*/
.playlog-item {
  display: flex;
}

/*时间轴*/
.playlog-item .dotline {
  width: 35px;
  position: relative;
}

/*竖线*/
.playlog-item .dotline .line {
  width: 1px;
  height: 100%;
  background: #ccc;
  position: absolute;
  top: 0;
  left: 15px;
}

/*圆点*/
.playlog-item .dotline .dot {
  width: 11px;
  height: 11px;
  background: #30ac63;
  position: absolute;
  top: 10px;
  left: 10px;
  border-radius: 50%;
}

/*时间戳*/
.playlog-item .dotline .time {
  width: 100%;
  position: absolute;
  margin-top: 30px;
  z-index: 99;
  font-size: 12px;
  color: #777;
  text-align: center;
}

/*右侧主体内容*/
.playlog-item .content {
  width: 100%;
  display: flex;
  flex-direction: column;
  border-bottom: 1px solid #ddd;
  margin: 3px 0;
}

/*章节部分*/
.playlog-item .content .chapter {
  font-size: 30rpx;
  line-height: 68rpx;
  color: #444;
  white-space: normal;
  padding-right: 10px;
}

/*课程部分*/
.playlog-item .content .course {
  font-size: 28rpx;
  line-height: 56rpx;
  color: #999;
}
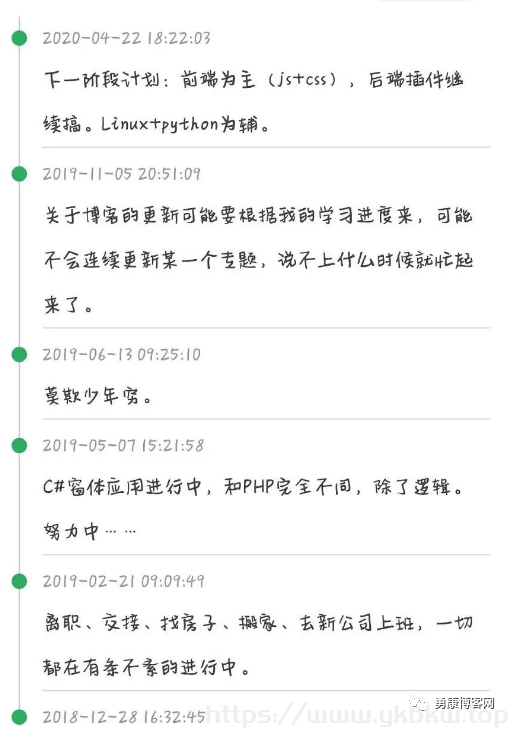
最终效果:

小程序的时间轴组件大概就是上面这样,下一期我们讲【小程序实现上拉分页】

